How to Duplicate a Schlage 9691T Fob on macOS with Proxmark3 easy
This comprehensive guide details how to duplicate a Schlage 9691T Dual-Frequency Fob (which contains both 125kHz LF and 13.56MHz HF chips) using a Proxmark3 Easy on macOS.
Hardware Prerequisites
Before starting, ensure you have the following:
- Proxmark3 Easy (256kB Flash Memory)
- Dual-frequency blank cards (T5577 LF + Mifare Classic 1K HF)
- MacBook/Mac computer running macOS
- USB-A to USB-C adapter/dongle (if your Mac only has USB-C ports)
- Your original Schlage 9691T fob to clone
1. Environment & Software Setup
The Proxmark3 requires specific drivers and the “Iceman” research firmware to function correctly on macOS. It works without it using other software but it’s recommended to use the Iceman firmware for better performance.
Top Tip: Run these commands within a Claude code, Cursor, Windsurf, or any other environment that supports terminal commands.
Install Dependencies
Open Terminal and run the following in order:
-
Xcode Command Line Tools:
xcode-select --install -
Homebrew (Package Manager): Visit brew.sh to install
-
XQuartz:
brew install xquartz
Install Proxmark3 (Iceman Fork)
Since the Proxmark3 Easy is a generic device with limited 256kB memory, you must use specific flags during installation to ensure the software fits the hardware.
brew tap RfidResearchGroup/proxmark3
# Stable release for generic/small devices:
brew install --with-generic proxmark3
Note: If the above fails, use the latest build: brew install --with-generic --with-small proxmark3.
Reference: Official macOS Installation Guide | Homebrew Proxmark3 Repo
2. Flashing the Firmware
Most Proxmark3 Easy units ship with outdated firmware. You must flash the device to match the software version you just installed.
The “Sticky Button” Method
Older bootloaders require manual intervention to stay in “flash mode.”
- Prepare: Type
pm3-flash-allin Terminal, but do not press Enter yet. - Disconnect: Unplug the Proxmark3 from the USB.
- Hold Button: Press and hold the physical button on the side of the Proxmark3.
- Connect: Plug the USB back in while continuing to hold the button.
- Execute: Press Enter on your keyboard.
- Wait: KEEP HOLDING THE BUTTON until the terminal explicitly says “All done.”
- Separate Flash (If Full Image Fails):
If the device has strictly limited memory, flash in two stages:
pm3-flash-bootrompm3-flash-fullimage
3. The Cloning Process
The Schlage 9691T is a Dual-Frequency fob. You must clone both sides for it to work on all readers.
Step 1: Clone the LF Side (125kHz HID)
- Connect: Type
pm3to start the interface. - Read Original: Place original fob on the antenna and run:
lf search - Note the Raw Data: Look for the raw hex string (e.g.,
0000000000000020049b4901). - Clone to Blank: Place your
dual-frequency T5577 blank card on the antenna and run:
lf hid clone -r <your_raw_hex> - Verify: Run
lf searchagain to ensure the card now reports as a Schlage/HID credential.
Step 2: Clone the HF Side (13.56MHz Mifare Classic)
⚠️ Critical: Fob Positioning
The Schlage 9691T requires very specific placement on the HF antenna for detection. Most places result in “No tag found” errors.
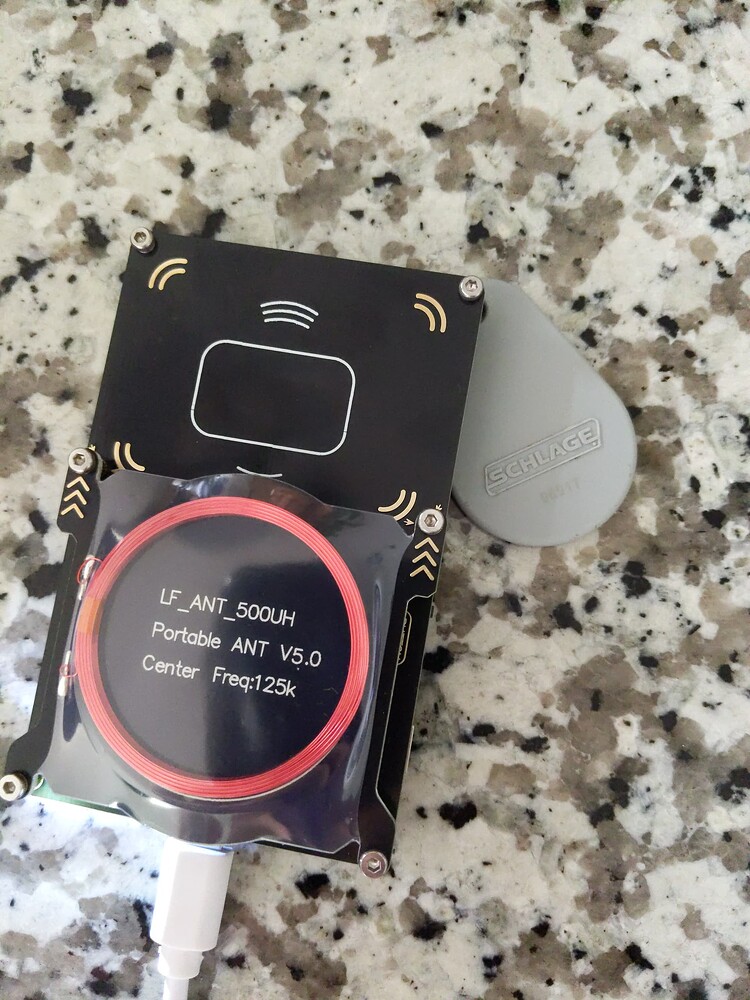
Image:Position the fob like the image above and you should be good to go.
Reference: DangerousThings Forum Discussion
-
Read/Crack Original: Place the original fob on the antenna as shown above and run:
hf mf autopwn -
Locate Files: This creates a
.bin(dump) and a.key(key) file in your user folder.- Example:
/Users/isowunmi/hf-mf-DBB92C22-dump.bin
- Example:
-
Identify Blank Type: Place your blank card on the antenna and run:
hf search- Look for “Magic capabilities… Gen 1a”.
4. 🛑 Critical Callout: Writing Block 0
When cloning Mifare Classic cards, standard commands often fail on Block 0, which contains the UID (the card’s unique ID).
Why
hf mf restoreFailsIf you use
hf mf restore, the terminal may show( ok )for blocks 1-63 but( fail )for Block 0. This is because Block 0 is hard-locked on standard cards and requires a “Backdoor” command to overwrite.
The Solution: Use
cloadFor Gen 1a Magic Cards, use the “Chinese Magic Card Load” command. This bypasses authentication and force-writes the entire card, including the UID.
Run this command:
hf mf cload -f /Users/isowunmi/hf-mf-<YOUR_UID>-dump.bin
5. Summary Reference
Command Comparison
| Command | Block 0 (UID) | When to Use |
|---|---|---|
hf mf restore |
❌ Fails | Gen 2/CUID cards (data updates only) |
hf mf cload |
✅ Works | Gen 1a Magic Cards (Full Clone) |
Troubleshooting Tips
- LF Card Not Detected: T5577 chips often appear as “unknown” or blank until they are written to for the first time.
- Positioning: Dual-frequency cards are sensitive. If a command fails, try shifting the fob 1cm in any direction or flipping it over.
- File Paths: If Terminal cannot find your dump file, drag the file directly from Finder into the Terminal window to auto-fill the correct path.
Educational Purpose Notice: This guide is intended for educational purposes, security research, and cloning your own authorized credentials. Always comply with local laws and regulations regarding RFID security devices.
Credit to @Chrisfu on Twitter & the iceman fork of Proxmark3 for the guide.